


Best video encoding settings for youtube and H264/H265
H264/265 codecs use compression to create small files with the downside of sacrificing video quality. The quality hit depends on the footage, where the shots with lots of movement or film grain suffer the most.
Here you can see a file from Davinci Resolve encoded using H265 master preset, both of which look pretty bad. If you upload these videos to youtube the quality will drop even further, but there are ways to improve it.
YOUTUBE RESOLUTION
Youtube uses two different codecs - avc and vp9, the latter offers better picture quality and less compression. In order to trigger VP9 encoding, the file must be greater than 1080p, so even if you work in 1080p you should render the final video as 2k if you’re planning on uploading it to YouTube. To do that simply switch your project resolution and render it at 2k 16:9. For maximum quality, you should upscale it to UHD because that will give your video a much higher bitrate.
YOUTUBE COMPRESSION
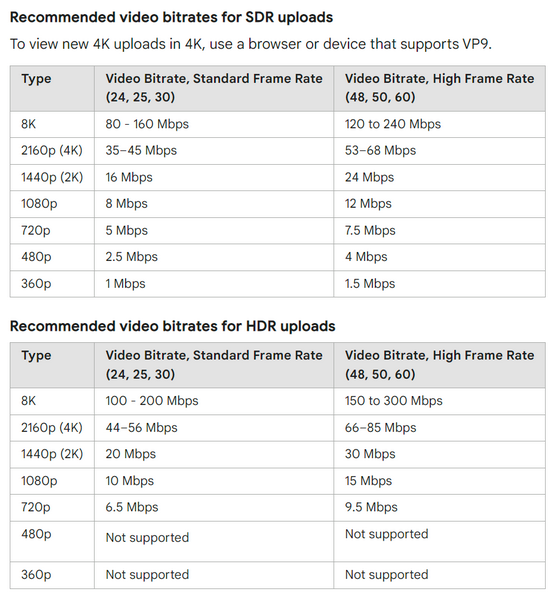
When it comes to compression, YouTube's recommended page lists a type of codecs and bitrate ranges for different resolutions and frame rates.
Even if you use the recommended codec, YouTube will still convert the file, making compression artifacts even more pronounced. So, If your upload speed is good enough, you should use high-quality intermediate codecs such as ProRes HQ or DNxHQ to upload the files. They’re supported by youtube, and this way you will eliminate additional compression and will give youtube the best file to work with.
CREATING H265 FILE
You can then use the same master file to create a smaller version for storage instead of rendering it from Davinci Resolve. The reason is that Resolve doesn’t use good encoders for h264/265, so I only use it to generate quick review files.
To demonstrate what it does to video quality, I created a master file in DNxHQ, which I will compare to H265 conversions from Resolve.
If we look at the DNxHQ file with a heavy grade, we see that the sky gradient remains smooth, and there’s a bit of camera noise that adds texture to the image. Now, if we add the same grade to the H265 master file from Resolve, we see that the quality dropped by a lot. All the texture is gone, the file looks softer, and there’s a lot of banding in the sky. The master preset uses a 20mb/s bitrate, which is low, so let’s try adding more. As we see that the results improve every time I add more bitrat,e but after 80, the difference becomes less noticeable with every increase and looks worse than the original.


SOFTWARE VS HARDWARE ENCODER
If you have a studio version of Davinci Resolve, you can use a hardware encoder depending on your machine. I havea GeForce RTX3080, so I can choose the Nvidia encoder.

If I compare the results against the software encoder, it looks better, and it renders files faster. The image looks decent at 60mb/s but even at 120mb/s, it is still worse than the original.


The result of hardware encoding will depend on your computer, so you might want to do some tests to compare the two.
WHAT ABOUT H264?
H264 files show worse quality than H265 at lower bitrates. The reasons to use H264 instead of H265 are better compatibility with older devices, smoother playback in NLEs, and faster encoding speeds. If you want to use H264 you need to make sure that your bitrate is set to at least 80mb/s for UHD files and enable multipass encoding.
DAVINCI RESOLVE VS HANDBRAKE
Now, if we compare it with the handbrake that I use for all my H264/265 encoding, the results are much better even at lower bitrates and filesizes. Here’s is 40mb/s file from handbrake compared to the 120mb/s file from Resolve, and we see that the handbrake version doesn’t have banding and retains some of the original texture and is much closer to the original while also being 3 times smaller than H265 from resolve. The reason is that the handbrake uses open-source x264 and x265 encoders, which are much more efficient and allow you to fine-tune the settings. The only downside is that you need to add an extra step and spend more time encoding, but the results are worth it.


RECOMMENDED DAVINCI RESOLVE SETTINGS
If you still prefer to do everything in Resolve and don’t want to add an additional step to your workflow, here are a couple of tips
Don’t use Resolve’s presets, especially the ones that are labeled YouTube because they limit the bitrate to 10mb/s resulting in bad-quality video
If you have an Nvidia RTX 3000 or 4000 video card series, use the Nvidia encoder instead of the software. If you have a different configuration, do some tests and compare the software encoder with the hardware using the same bitrate setting
For H265 files, the best is limited to 20mb/s which is low, so use manual values instead.
For UHD files with lots of movement and texture, keep your bitrate above 50mb/s in H265 to retain the quality
For Adobe Premiere or Media Encoder, always use 2nd pass encoding and have the H265 bitrate go to the max setting, which is 25mb/s
*these recommendations are based on Davinci Resolve 17.4
HANDBRAKE SETTINGS
Now let’s move to the handbrake. Handbrake is a free multi-platform program and you can download it from the official website.
In the Dimensions tab, choose Resolution and Scaling to None if you don’t want to change the resolution of your file.

In Filters tab turn switch Deinterlace to off because it’s set to Decomb by default.

In the Video Encoder option, I choose x265 10bit since it’s smaller and better quality than x264. I use 10-bit even if my source is 8-bit because it doesn’t affect the file size and can help with banding.
Framerate Same as source - Constant Framerate
Quality you can set it from 51 to 0, where 0 is the least compressed. I keep the range between 16-12 where and keep it 14 for most transcodes as a nice balance between the filesize and quality. You can go with a higher value than 16 if you have a longer clip and you want to save on some space but you might see some reduction in quality. Do a short test first to determine which value will work best for you.
You can also choose the Avg Bitrate option if you want to have control over the file size. For UHD files, 40mb/s bitrate produces excellent results. Make sure to choose 2-Pass Encoding if you need to lower the bitrate.
Encoder Preset I use Medium. Think of it as the time your computer spends analyzing and encoding the frames. In my tests, I haven’t noticed that much difference between Medium and Slow, but if I choose Fast, the quality drops, so I keep it at Medium.
In Encoder Tune, you can choose Grain if you have grain in your clip, which will add additional bitrate to reduce the artifacts that you might see when working with grainy footage. If you don’t have any grain, set it to None.
The rest of the parameters I keep at default.

You can then save these settings as a preset and use them for batch encoding files in the future.
Handbrake is a very powerful program and there is a lot of documentation available online to learn it’s capabilities. I hope these tips will help you get started.